

This article will focus on implementing CA-signed certificates and enabling the HTTPS protocol on Brocade switches. I assume you already have a Certificate Authority implemented and you can sign certificates requests.
Table of Contents
Required/used freeware
Putty: Used to connect to the switch.
Alex’s FTP Server: Used to upload and download files from or onto the switch.
OpenSSL: Used to convert and test certificate files.
Dos2Unix: Used to convert Windows-created filed to Unix/Linux files.
Deprecated commands:
seccertUtil
seccertUtil CLI will be deprecated. Use secCertMgmt for Certificate related operations.
The command seccertUtil is replaced by secCertMgmt.
It is highly recommended to back up your switch configuration before performing any changes. For tracing purposes, I have configured my Putty terminal to log every session. It will also flush the log file frequently.
Generating Certificate Signing Request (.csr) file
To list available certificates on the switch use the command:
seccertmgmt show -all
To create the .csr file in interactive mode type
seccertmgmt generate -csr https

Generate the file and export it locally. Accordingly, request your CA to have it signed.
The following command exports the .csr file in an interactive mode:
seccertmgmt export -csr https -protocol ftp

Preparing certificates for import
I signed the client’s certificate and got it in a .cer file. I also have the Root and Intermediate certificates in my possession.
Brocade switches require to have root and intermediate certificates merged into one file. The merge order is also important, first the Root certificate then the Intermediate. Work your way up the chain to the root certificate.
Before merging the certificates we will convert them to .pem files. To convert them from .cer to .pem file format use the following command
openssl x509 -in <certificate path & file name> -out <certificate path & file name>


Combining Root and Intermediate certificate
To merge the certificates use the Windows copy command. The /B parameter prevents Windows to append ASCII characters (CTRZ – Z) to the file.
copy /B <file name path 1> <file name path 2> <destination file name path>

Converting Windows files to Unix
Files created in Windows are sometimes incorrectly read in Unix/Linux. It’s because of Windows handling i.g. newlines and carriage returns in a different way.
In order to “clean” the certificates, we will use the tool dos2unix to convert them into Unix files.
dos2unix.exe <file name>
The file is rewritten and the output is saved under the same location.

Testing certificates
Additionally, we can test the certificate chain and our client certificate using the following command.
openssl verify -verbose -purpose sslserver -CAfile <root certificate.pem> <switch certificate.pem>

Importing certificates
First, we will import the root certificate using the command below.
seccertmgmt import -ca -server https

Finally, we can import the switch certificate file.
seccertmgmt import -cert https
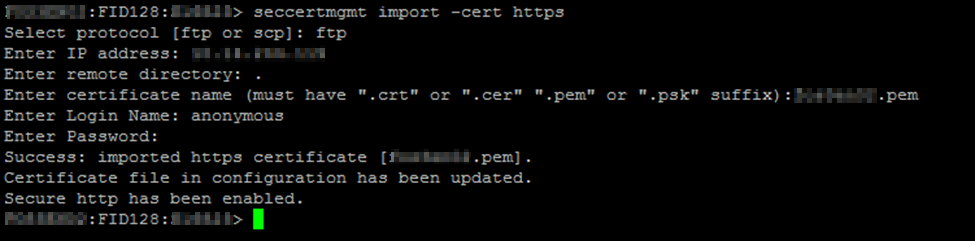
We have enabled the switch to communicate over HTTPS protocol and HTTP requests are redirected to HTTPS.
I’ve noticed my Brocade Network Advisor claims that the switch is unreachable after installing the certificate. Finally, I got this resolved by performing a hareboot. The hareboot restarts the web linker daemon which is responsible for web communication.
Any suggestion or question? Leave a reply below, or feel free to contact us. Make sure to subscribe to our mailing list to get the latest.


11 Responses
Above procedure step by step for FOS v.8 version and configured successfully.
Good to hear that. Thanks for letting me know. Cheers, Dardan.
vERY HELPFUL, THANK YOU! iT WOULD HAVE HELPFUL TO KNOW THE EXACT ORDER OF MERGING IN THE SCREEN SHOTS BUT THEY ARE BLURRED. sTILL THANKS AGAIN.
In brocade Fabric OS Administration Guide 8.2.x there is a section “Creating a Complete Chain of CA Certificates”.
Hello
Can anyone also suggested to revert to http after you enabled https. I did in one of my switch but now i want to go back to http. I am unable to find any suggestions on it
Hello,
Removing installed certificates will revert back to unsecured HTTP.
seccertmgmt delete -allRegards,
Dardan
thanks. Is this safe to do. Will any of the supv card reboot?. when i run seccertutil show i see the *.pem file i had created
se10hsans13:admin> seccertutil show
ssl private key: Exists
List of certificate files:
pem_10.174.128.124.pem
pls suggest
can i specifically delete the *.pem file
here is the output of SECCERTUTIL SHOW -ALL
:root> seccertutil show -all
ssh private key:
Does not Exist
ssh public keys available for users:
admin
Certificate Files:
——————————————————————————————————————–
Protocol CA SW Location CSR PVT Key Passphrase
——————————————————————————————————————–
FCAP switch.0.rootcrt switch.0.crt /etc/fabos/pki/tp Empty Empty Empty
LDAP swLdapca.pem NA /etc/fabos/certs/ldap NA NA NA
SYSLOG Empty NA /etc/syslog-ng/ca.d NA NA NA
HTTPS none pem_10.174.128.124.p /etc/fabos/certs/sw0 Exist Exist NA